7. Node 프로젝트 가계부 만들기 (back-end와 api 연결)
2022. 1. 16. 16:37ㆍ프로젝트/가계부 - 초기 개발
지난 글 :
https://crispypotato.tistory.com/134
6. Node 프로젝트 가계부 만들기 (Vue, 라이브러리 설치)
npm i axios Vue2와 Vue-cli 이용해서 프로젝트를 제작한다. 1. Vue-cli를 설치한다. npm i -g @vue/cli 2. Vue-cli를 사용하여 프로젝트 생성 ex) vue create test-vue vue create Vue2 Default 로 설정 하고 엔..
crispypotato.tistory.com
요약
설치 한 axios를 이용하여 back-end와 통신을 한다.
vue interceptor를 이용하여 로그인, 비로그인 상태를 구별 하여 전송시 인증 토큰 유무를 결정한다.
vue Interceptor 설명 참고 : https://crispypotato.tistory.com/59
/src/api/common 디렉토리에 interceptor.js 파일을 생성하여 vue interceptor를 제작한다.
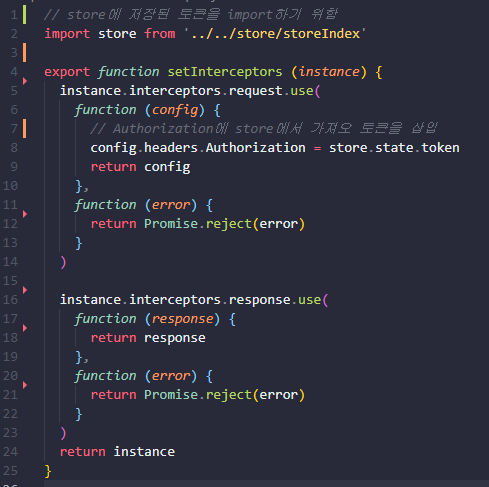
//interceptor.js
// store에 저장된 토큰을 import하기 위함
import store from '../../store/storeIndex'

export function setInterceptors (instance) {
  instance.interceptors.request.use(
    function (config) {
      // Authorization에 store에서 가져오 토큰을 삽입
      config.headers.Authorization = store.state.token
      return config
    },
    function (error) {
      return Promise.reject(error)
    }
  )

  instance.interceptors.response.use(
    function (response) {
      return response
    },
    function (error) {
      return Promise.reject(error)
    }
  )
  return instance
}
/src 안에 /api 디렉토리 안에 urlIndex.js 파일을 생성한다.
생성된 urlIndex.js 파일에 axios를 이용한 통신 함수를 생성한다.
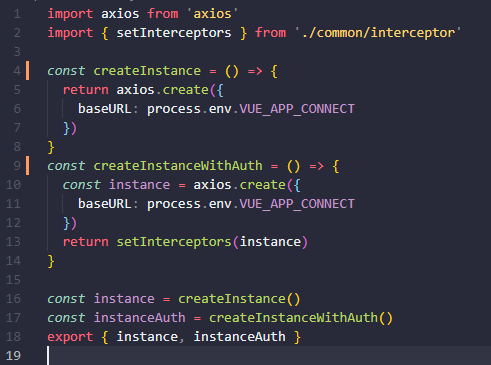
import axios from 'axios'
import { setInterceptors } from './common/interceptor'

const createInstance = () => {
  return axios.create({
    baseURL: process.env.VUE_APP_CONNECT
  })
}
const createInstanceWithAuth = () => {
  const instance = axios.create({
    baseURL: process.env.VUE_APP_CONNECT
  })
  return setInterceptors(instance)
}

const instance = createInstance()
const instanceAuth = createInstanceWithAuth()
export { instance, instanceAuth }
728x90
반응형
'프로젝트 > 가계부 - 초기 개발' 카테고리의 다른 글
| 8. Node 프로젝트 가계부 만들기 (api 생성) (0) | 2022.01.16 |
|---|---|
| 6. Node 프로젝트 가계부 만들기 (Vue, 라이브러리 설치) (0) | 2021.09.11 |
| 5. Node 프로젝트 가계부 만들기 (작성, 수정, 삭제 구현) (0) | 2021.05.25 |
| 4. Node 프로젝트 가계부 만들기 (로그인, passport, jwt 사용) (0) | 2021.05.25 |
| 3. Node 프로젝트 가계부 만들기 (회원가입) (0) | 2021.05.25 |